


Interfacing GT511C3 Fingerprint Sensor with Arduino – Enrol and Detect Fingerprints
In this article, we will discuss the GT511C3 finger-print sensor and how to interface it with Arduino. We will learn how to use the sensor with Arduino to enroll finger-prints on it and then detect the fingerprints whenever required. We will also show a red and green LED signal for verified and unknown finger respectively and provide a buzzer beep for unknown finger. This project is useful for access control, security, identification, and convenience. So, let’s get started with the GT511C3 module and it’s pin-out configuration.
Components Required
- Arduino Nano/UNO
- GT511C3 Finger Print Sensor
- 16x2 LCD screen
- Push button
- Connecting Wires
- Breadboard
- Small piezoelectric buzzer
- 10k potentiometer
- 2 LED (1 red and 1green)
GT511C3 Fingerprint Sensor Module
There are many fingerprint sensors available in the market like capacitive, ultrasonic, thermal, etc. But here we use the GT511C3 sensor, which is more advanced with high accuracy and faster response time. This is a small embedded module with an optical sensor mounted on the circuit board. This optical sensor first scans a finger-print, then these scans are processed by ARM Micro-controller.
This GT511C3 module is different from other Fingerprint sensor modules like the Capacitive and Ultrasonic modules. GT511C3 Module uses an optical sensor to scan fingerprints. That means it depends on the captured images of your fingerprint to recognize its pattern. Actually, there is an in-built camera inside it which takes pictures of your fingerprint and then processes these captured images using powerful in-built ARM Cortex M3 IC.


The camera is surrounded by blue LEDs; for a clear image of the fingerprint, these LEDs have to glow. After that, the image captured it processed and converted into binary value by using the ARM Microcontroller which is coupled with EEPROM. To indicate power there is a green color SMD LED. The image of every fingerprint is of 202x258 pixels and a resolution of 450dpi. The sensor can scan up to 200 fingerprints and assigns an ID from 0 to 199, to every fingerprint. Then during detection, this module can automatically compare the scanned fingerprint with all the 200 fingerprints saved previously, and if any fingerprint matches with saved ones it gives an ID number of that particular fingerprint by using the algorithm Smack Finger 3.0 on the ARM Microcontroller. The sensor communicates through serial communication at 9600. The communication pins (Rx and Tx) is said to be only 3.3V tolerant.
Another very useful feature of the sensor is it has a metal casing around the sensing region. As mentioned earlier the blue LED needs to be turned on for the sensor to work. But in applications where the sensor should actively wait for a fingerprint, it is not possible to keep the LED turned on always since it will heat the sensor and thus damage it. Hence in those cases, the metal casing can be wired to a capacitive touch input pin of an MCU to detect if it is being touched. If it is, then the LED can be turned on and the sensing process can be started.
GT511C3 Module Pinout Configuration

|
Pin Name |
Description |
|
VCC |
The Vcc pin powers the Module, typically with +5V |
|
GND |
Power Supply Ground |
|
TX |
UART Transmitter Pin |
|
RX |
UART Receiver Pin |
GT511C3 Module Features & Specifications
- Operating Voltage: 3.3V to 6V DC
- Operating Current: < 130mA
- Operating Temperature: ~20°C ~ +60°C
- CPU: ARM Cortex M3 Core (Holtek HT32F2755)
- Max no of fingerprints: 200 fingerprints
- Sensor: Optical Sensor
- Serial Communication: UART (Default: 9600 baud) and USB v1.1 (Full Speed)
- False Acceptance Rate (FAR): < 0.001%
- False Rejection Rate (FRR): < 0.01%
- Enrolment Time < 3 sec (3 fingerprints)
- Identification Time: <1.0 seconds (200 fingerprints)
Now let’s move to the interfacing part. Here we want to show the output on the LCD display. So, we need to interface the GT511C3 module as well as 16x2 LCD with the Arduino. For interfacing, we have to make the proper connection.
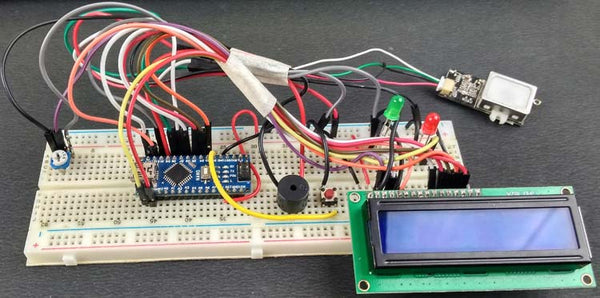
Connecting GT511C3 Finger Print Sensor and LCD with Arduino
We already discussed about the pins of GT511C3 using that we have to make the connection. Here we are using an Arduino Nano board, an LCD to display the sensor status. The Sensor has to be powered by 3.3V but we have to make sure that the Arduino can source enough current for the sensor. We have connected the LCD in 4-bit mode powered by the 5V pin of Arduino. The Piezoelectric buzzer is connected to D9 pin and LED’s to D10 and D13 respectively. A push-button is connected to the D2 pin of Arduino. When we pressed this, will put the program in enroll mode where the user can enroll a new finger. After enrolling, the program will remain in scanning mode to scan for any finger touching the sensor.
Here we also need a library (GT511C3 Arduino library) which can be used directly with Arduino to Enroll and detect fingerprints. The complete circuit diagram for interfacing GT511C3 FPS with Arduino can be found below.
Arduino Programming for GT511C3 Finger Print Sensor
We want to write a program here that will enroll a finger when the button is pressed and display the ID number of that particular finger that is already scanned and saved. As always we need to begin the program by including the required libraries, here we will need the FPS_GT511C3 library for our FPS module, Software serial to use pin D4 and D5 on serial communication, and Liquid crystal for LCD interfacing.
Then we need to mention the pins which are connected to the Fingerprint sensor, LCD, LEDs, and Buzzer.
#include "FPS_GT511C3.h"
//Get library from https://github.com/sparkfun/Fingerprint_Scanner-TTL
#include "SoftwareSerial.h" //Software serial library
#include <LiquidCrystal.h> //Library for LCD
FPS_GT511C3 fps(7, 8); //FPS connected to D7 and D8
const int rs = 12, en = 11, d4 = 6, d5 = 5, d6 = 4, d7 = 3;
//Mention the pin number for LCD connection
LiquidCrystal lcd(rs, en, d4, d5, d6, d7); //Initialize LCD method
int led1 = 10;
int led2 = 13;
const int buzzer = 9;
Inside the setup function, we display some introductory message on the LCD and then initialize the FPS module. The command line fps.SetLED(true) will turn on the blue LED of the sensor if you want to turn it off then use fps.SetLED(false) command when not required. We have also made the D9, D10, and D13 pin as output pins for the buzzer and led’s while pin D2 as an input pin and connected it to a push button.
Serial.begin(9600);
lcd.begin(16, 2); //Initialise 16*2 LCD
lcd.print("GT511C3 FPS"); //Intro Message line 1
lcd.setCursor(0, 1);
lcd.print("with Arduino"); //Intro Message line 2
delay(2000);
lcd.clear();
pinMode(led1, OUTPUT);
pinMode(led2, OUTPUT);
pinMode(buzzer, OUTPUT);
delay(100);
fps.Open(); //send serial command to initialize fps
fps.SetLED(true); //turn on LED so fps can see fingerprint
pinMode(2,INPUT_PULLUP); //Connect to internal pull up resistor as input pin
Inside the void loop function, first we have to write the code for led’s and buzzer and, to show the output on the LCD display.
if (fps.IsPressFinger())
{
fps.CaptureFinger(false);
int id = fps.Identify1_N();
lcd.clear();
if (id <200) //<- change id value depending model you are using
{//if the fingerprint matches, provide the matching template ID
digitalWrite(led1, HIGH);
delay(1000); // wait for a second
digitalWrite(led1, LOW);
lcd.setCursor(0, 0);
lcd.print("Welcome:");
lcd.print(id);
delay(2000);
}
else
{//if unable to recognize
digitalWrite(led2, HIGH);
delay(1000);
digitalWrite(led2, LOW);
tone(buzzer, 1000); // Send 1KHz sound signal...
delay(1000);
noTone(buzzer);
lcd.print("Unknown");
delay(2000);
}
Then, if the button is pressed, we will enroll a new finger and save its template with a unique ID number by using the enroll function. If not we will keep waiting for a finger to be pressed in the sensor. If pressed we will identify the fingerprint by comparing it to all saved fingerprint templates using the 1:N method. Once the ID number is discovered we will display welcome followed by the ID number. If the fingerprint did not match with any of the enrolled fingers the id count goes up to 200. In that case, we will display the welcome unknown. The enroll function would have to take three sample inputs to enroll one finger successfully.
int enrollid = 0;
bool usedid = true;
while (usedid == true)
{
usedid = fps.CheckEnrolled(enrollid);
if (usedid==true) enrollid++;
}
fps.EnrollStart(enrollid);
// enroll
lcd.clear();
lcd.print("Enroll #");
lcd.print(enrollid);
while(fps.IsPressFinger() == false) delay(100);
bool bret = fps.CaptureFinger(true);
int iret = 0;
if (bret != false)
{
lcd.clear();
lcd.print("Remove finger");
fps.Enroll1();
while(fps.IsPressFinger() == true) delay(100);
lcd.clear(); lcd.print("Press again");
while(fps.IsPressFinger() == false) delay(100);
bret = fps.CaptureFinger(true);
if (bret != false)
{
lcd.clear(); lcd.print("Remove finger");
fps.Enroll2();
while(fps.IsPressFinger() == true) delay(100);
lcd.clear(); lcd.print("Press yet again");
while(fps.IsPressFinger() == false) delay(100);
bret = fps.CaptureFinger(true);
if (bret != false)
{
lcd.clear(); lcd.print("Remove finger");
iret = fps.Enroll3();
if (iret == 0)
{
lcd.clear(); lcd.print("Enrolling Success");
}
else
{
lcd.clear();
lcd.print("Enroll Failed:");
lcd.print(iret);
}
}
else lcd.print("Failed 1");
}
else lcd.print("Failed 2");
}
else lcd.print("Failed 3");
}
The complete code for the same is given at the end.
Working of GT511C3 Finger Print Sensor with Arduino
Now the hardware and programming part is ready to use, its time to test our project. Upload the program to Arduino through USB and power it up, When it starts we should see the introductory message on the LCD then it should display “Hi!..”. This means the Fingerprint sensor is ready to scan the finger, if any enrolled(saved) finger is pressed it would say “Welcome” followed by the ID number of that finger.

If we want to enroll a new finger has then we have to use the push button to get into enroll mode and follow the LCD instruction to enroll a finger. After the enrolling process, the LCD will display “Hi!..” again to indicate that it is read to identify fingers again.
Code (Program) for the Project:
#include "FPS_GT511C3.h" //Get library from https://github.com/sparkfun/Fingerprint_Scanner-TTL
#include "SoftwareSerial.h" //Software serial library
#include <LiquidCrystal.h> //Library for LCD
FPS_GT511C3 fps(7, 8); //FPS connected to D7 and D8
const int rs = 12, en = 11, d4 = 6, d5 = 5, d6 = 4, d7 = 3; //Mention the pin number for LCD connection
LiquidCrystal lcd(rs, en, d4, d5, d6, d7);//Initialize LCD method
int led1 = 10;
int led2 = 13;
const int buzzer = 9;
void setup()
{
Serial.begin(9600);
lcd.begin(16, 2); //Initialise 16*2 LCD
lcd.print("GT511C3 FPS"); //Intro Message line 1
lcd.setCursor(0, 1);
lcd.print("with Arduino"); //Intro Message line 2
delay(2000);
lcd.clear();
pinMode(led1, OUTPUT);
pinMode(led2, OUTPUT);
pinMode(buzzer, OUTPUT);
delay(100);
fps.Open(); //send serial command to initialize fps
fps.SetLED(true); //turn on LED so fps can see fingerprint
pinMode(2,INPUT_PULLUP); //Connect to internal pull up resistor as input pin
}
void loop()
{
if (digitalRead(2)==0)//If button pressed
{
Enroll(); //Enroll a fingerprint
}
// Identify fingerprint test
if (fps.IsPressFinger())
{
fps.CaptureFinger(false);
int id = fps.Identify1_N();
lcd.clear();
if (id <200) //<- change id value depending model you are using
{//if the fingerprint matches, provide the matching template ID
digitalWrite(led1, HIGH);
delay(1000); // wait for a second
digitalWrite(led1, LOW);
lcd.setCursor(0, 0);
lcd.print("Welcome:");
lcd.print(id);
delay(2000);
}
else
{//if unable to recognize
digitalWrite(led2, HIGH);
delay(1000);
digitalWrite(led2, LOW);
tone(buzzer, 1000); // Send 1KHz sound signal...
delay(1000);
noTone(buzzer);
lcd.print("Unknown");
delay(2000);
}
}
else
{
lcd.clear(); lcd.print("Hi!....."); //Display hi when ready to scan
}
}
void Enroll() //Enrol function from library exmaple program
{
int enrollid = 0;
bool usedid = true;
while (usedid == true)
{
usedid = fps.CheckEnrolled(enrollid);
if (usedid==true) enrollid++;
}
fps.EnrollStart(enrollid); // enroll
lcd.clear();
lcd.print("Enroll #");
lcd.print(enrollid);
while(fps.IsPressFinger() == false) delay(100);
bool bret = fps.CaptureFinger(true);
int iret = 0;
if (bret != false)
{
lcd.clear();
lcd.print("Remove finger");
fps.Enroll1();
while(fps.IsPressFinger() == true) delay(100);
lcd.clear(); lcd.print("Press again");
while(fps.IsPressFinger() == false) delay(100);
bret = fps.CaptureFinger(true);
if (bret != false)
{
lcd.clear(); lcd.print("Remove finger");
fps.Enroll2();
while(fps.IsPressFinger() == true) delay(100);
lcd.clear(); lcd.print("Press yet again");
while(fps.IsPressFinger() == false) delay(100);
bret = fps.CaptureFinger(true);
if (bret != false)
{
lcd.clear(); lcd.print("Remove finger");
iret = fps.Enroll3();
if (iret == 0)
{
lcd.clear(); lcd.print("Enrolling Success");
}
else
{
lcd.clear();
lcd.print("Enroll Failed:");
lcd.print(iret);
}
}
else lcd.print("Failed 1");
}
else lcd.print("Failed 2");
}
else lcd.print("Failed 3");
}