


Hand Gesture Controlled Robotic Car Using MPU6050 & ESP32
This project demonstrates a wireless hand gesture-controlled robot using two ESP32 boards, an MPU6050 motion sensor, BLE communication, and an L293d motor driver. One ESP32 is mounted on a wearable glove along with the MPU6050 sensor, while the second ESP32 is installed on the robot chassis.
The MPU6050 continuously tracks hand tilt and orientation. The glove ESP32 processes this motion data and wirelessly transmits movement commands to the robot ESP32 using Bluetooth Low Energy (BLE). Based on the received commands, the robot controls two DC motors independently using differential drive logic.
By simply tilting the hand forward, backward, left, or right, the robot can move smoothly in the corresponding direction without any physical controller or smartphone application.

Components Required
- For Car
- For Glove
About the Components
2 Wheel DIY Robot Car Chassis
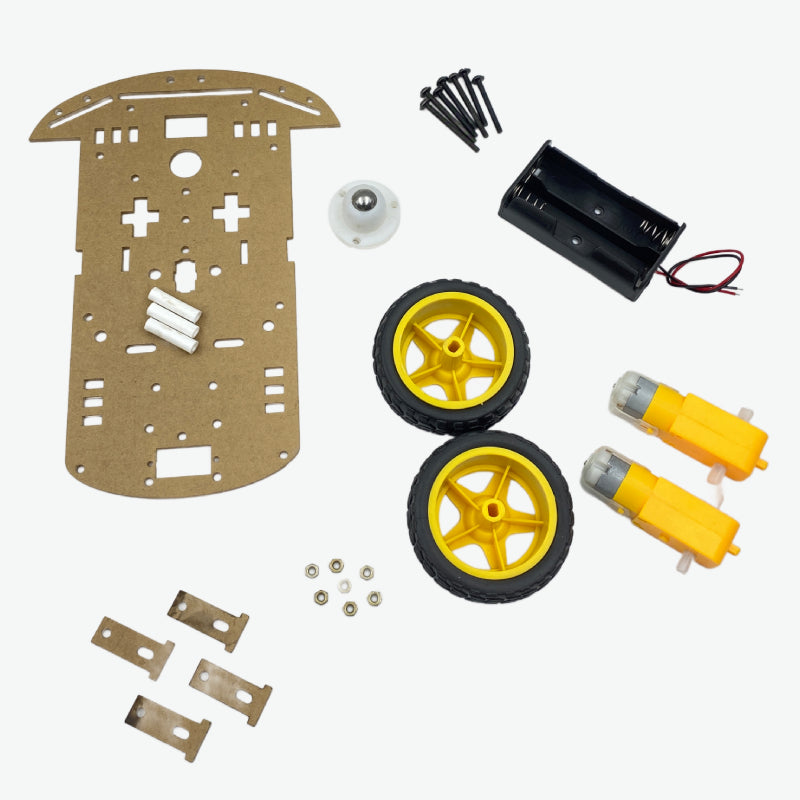
The robot chassis forms the mechanical base of the project. It contains two geared DC motors attached to the left and right wheels, while a caster wheel provides front support and balance. This setup creates a differential drive robot capable of moving in all directions.
- Drive Mechanism: Differential Drive
- Motors: Dual DC geared motors
- Wheel Configuration: 2 drive wheels + caster wheel
- Application: Robotics and STEM learning projects
- Body Material: Acrylic chassis platform
ESP32 Development Board
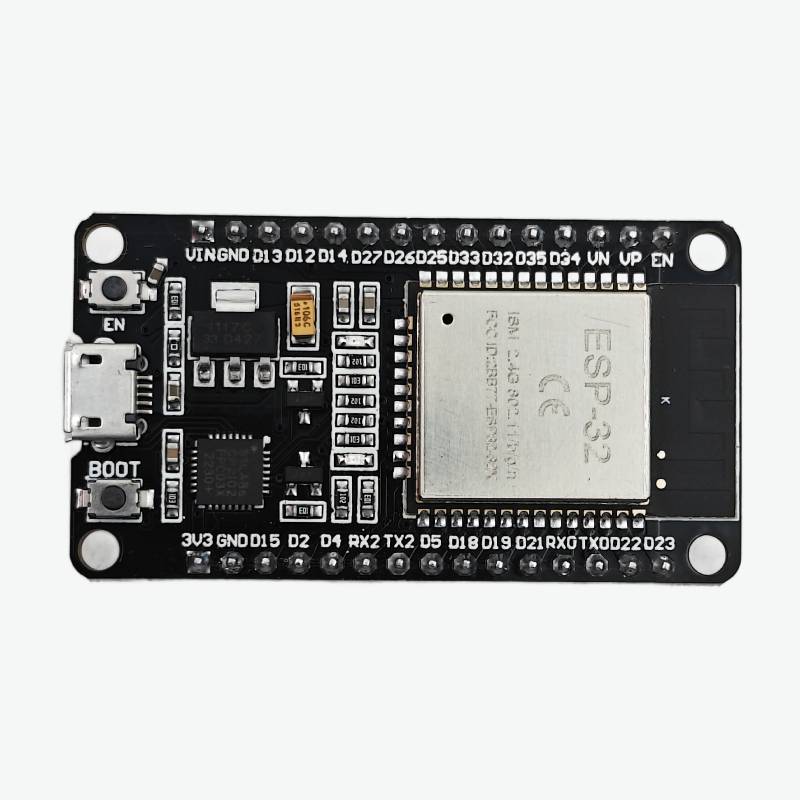
Two ESP32 boards are used in this project. One ESP32 acts as the glove transmitter while the second ESP32 acts as the robot receiver. The ESP32 provides high-speed processing, PWM motor control, BLE communication, and I2C support for the MPU6050 sensor.
- Microcontroller: Dual-core Tensilica LX6
- Operating Voltage: 3.3V
- Clock Speed: Up to 240 MHz
- Wireless: Wi-Fi + Bluetooth + BLE
- I2C Support: Yes
- PWM Support: Yes
MPU6050 Motion Sensor
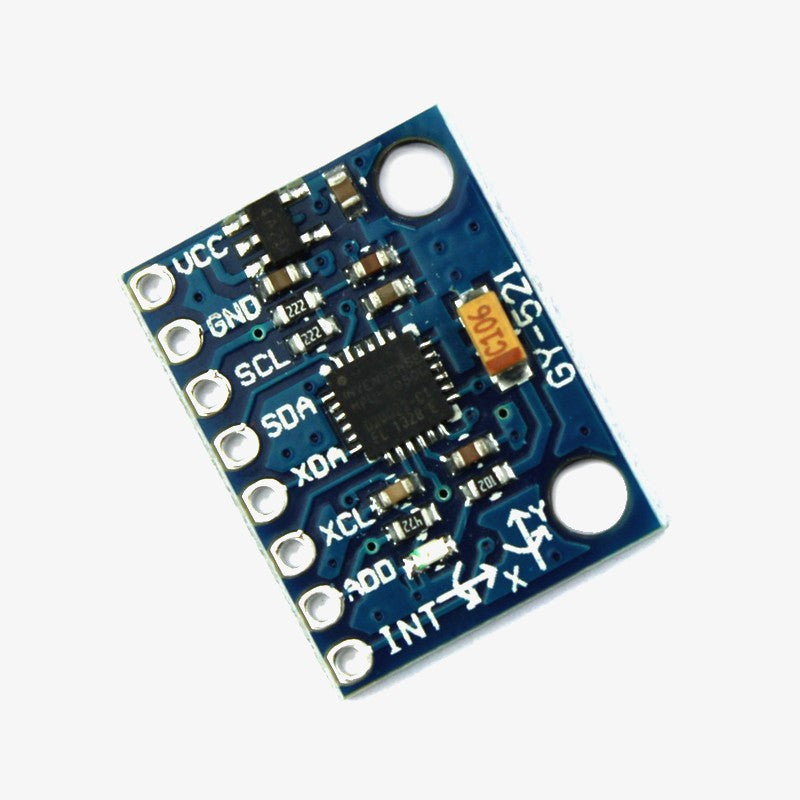
The MPU6050 is a motion tracking sensor that contains a 3-axis accelerometer and a 3-axis gyroscope. It continuously measures hand tilt and orientation to generate movement commands for the robot.
- Sensor Type: 6-axis motion sensor
- Communication: I2C
- Accelerometer: 3-axis
- Gyroscope: 3-axis
- Operating Voltage: 3V - 5V
- Default Address: 0x68
L293d Motor Driver
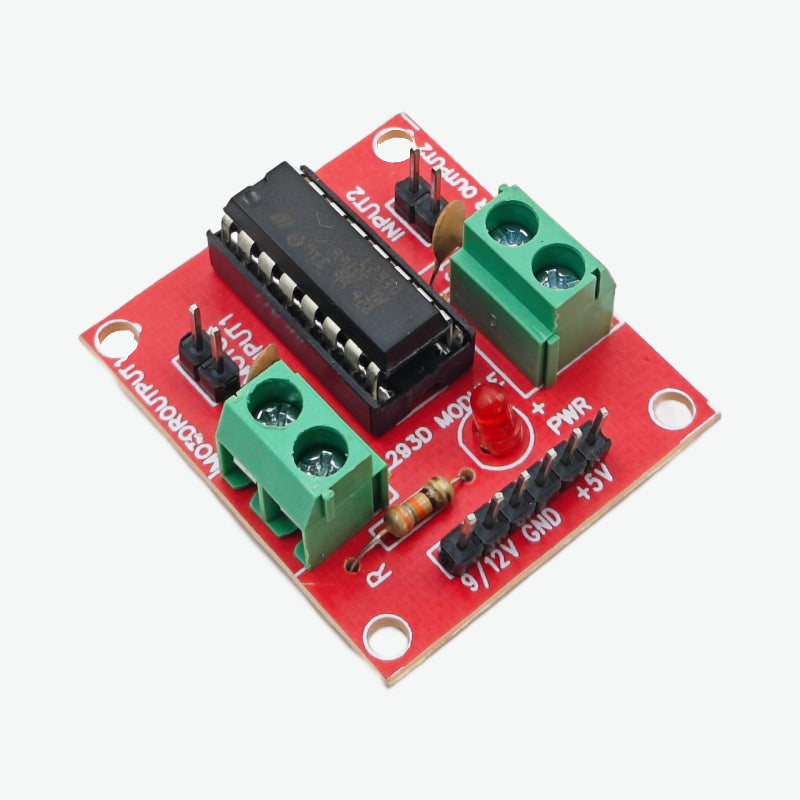
The L293d motor driver controls both DC motors independently. It receives direction and PWM signals from the ESP32 and provides sufficient current to drive the motors safely.
- Can be used to run Two DC or stepper motors with the same IC.
- Speed and Direction control is possible of both the motors
- Motor voltage output VCC: 4.5V to 36V
- Maximum Peak motor current: 1.2A
- Maximum Continuous Motor Current: 600mA
- Supply Voltage to the IC: 4.5V to 7V
- Transition time: 300ns (at 5Vand 24V)
- High Noise Immunity
- Screw terminals to easily connect the motors
Reusable Silicon Gloves
The glove acts as the wearable platform for the MPU6050 sensor and transmitter ESP32. It allows natural hand movement to control the robot wirelessly.
- Material: Flexible silicone
- Reusable: Yes
- Application: Wearable electronics projects
Li-Po Batteries
The 300mAh battery powers the glove ESP32 transmitter while the 7.4V Li-Po battery powers the robot chassis, motors, and receiver ESP32.
- 3.7V Battery: Portable glove power source
- 7.4V Battery: Robot motor power supply
- Rechargeable: Yes
- Compact: Suitable for mobile robotics
System Architecture
- Gesture Detection: The MPU6050 continuously measures hand tilt and rotation.
- Motion Processing: The glove ESP32 converts pitch and roll values into movement commands.
- Wireless Transmission: Commands are sent wirelessly using BLE communication.
- Motor Mixing: The robot ESP32 calculates left and right wheel speed using differential drive equations.
- Robot Movement: The L293d motor driver powers the motors according to received commands.
Circuit Connection
Fig. Circuit Diagram
Fig. Schematic Diagram
MPU6050 to ESP32 Connection
- VCC → 3.3V
- GND → GND
- SDA → GPIO 21
- SCL → GPIO 22
Motor Driver Power Connection
- L293d 5V → ESP32 GPIO 4
- 7.4V Li-Po Battery Positive → L293d 12V Input
- Battery GND → L293d GND
- ESP32 GND → L293d GND
GPIO 4 is used to enable the motor driver power section through software control. The 7.4V Li-Po battery powers the L293d motor driver and DC motors directly through the 12V input terminal.
Motor Connections
- Left Motor → OUT1 and OUT2
- Right Motor → OUT3 and OUT4
- Battery → L293d Power Input
Code Explanation
The project uses two separate sketches — one for the glove transmitter and one for the robot receiver. Each sketch is explained in full detail below.
Transmitter Code Explanation (Glove ESP32)
Libraries Used — Transmitter
- Wire.h → Enables I2C communication between the ESP32 and MPU6050 sensor. The MPU6050 uses I2C protocol to send accelerometer and gyroscope data to the ESP32.
- MPU6050_tockn.h → A third-party library that handles raw sensor data from the MPU6050 and automatically computes pitch and roll angles. It also provides a built-in gyro offset calibration function.
- BLEDevice.h → The core ESP32 BLE library. It initializes the BLE hardware and manages the device identity.
- BLEServer.h → Enables the ESP32 to act as a BLE server that other BLE clients (the robot ESP32) can connect to.
- BLEUtils.h → Provides utility classes and helper functions used internally by the BLE stack.
- BLE2902.h → Implements the GATT descriptor 0x2902 (Client Characteristic Configuration Descriptor), which is required to enable the NOTIFY property on a BLE characteristic.
Global Objects and UUIDs
- MPU6050 mpu(Wire) → Creates an MPU6050 sensor object using the Wire (I2C) bus. This object is used throughout the sketch to read angle data.
-
BLECharacteristic *pCharacteristic → A global pointer to the BLE characteristic. This is declared globally so it can be accessed in both
setup()andloop(). - SERVICE_UUID → A unique identifier for the BLE service. Both the transmitter and receiver must use the exact same UUID so they can recognize each other.
- CHARACTERISTIC_UUID → A unique identifier for the specific data channel (characteristic) used to send throttle and steering values.
setup() — Transmitter
- Serial.begin(115200) → Starts serial communication at 115200 baud for debugging output in the Arduino Serial Monitor.
- Wire.begin(21, 22) → Initializes the I2C bus using GPIO 21 as SDA (data) and GPIO 22 as SCL (clock). These are the default I2C pins on the ESP32.
- mpu.begin() → Initializes the MPU6050 sensor over I2C and prepares it for reading.
-
mpu.calcGyroOffsets(true) → Performs automatic gyroscope calibration. The sensor must remain completely still during this process. It samples the gyro many times and calculates the average offset to cancel out drift. The
trueparameter enables serial output showing calibration progress.
- BLEDevice::init("Glove_Controller") → Initializes the BLE stack and sets the device name to "Glove_Controller". This name is visible to nearby BLE scanners.
- BLEDevice::createServer() → Creates a BLE server instance. The glove ESP32 acts as the server because it owns and publishes the data.
- pServer->createService(SERVICE_UUID) → Creates a BLE service under the specified UUID. A BLE service is a logical container that groups related characteristics.
-
createCharacteristic(...) → Creates the data characteristic with two properties:
PROPERTY_NOTIFY(pushes data to connected clients automatically) andPROPERTY_READ(allows clients to manually request the current value). - addDescriptor(new BLE2902()) → Attaches the CCCD descriptor, which is mandatory for the NOTIFY property to work. Without this, the receiver cannot subscribe to notifications.
- pService->start() → Activates the service and makes the characteristic available.
- pAdvertising->start() → Starts BLE advertising so nearby devices can discover the glove ESP32 and initiate a connection.
loop() — Transmitter
- mpu.update() → Must be called every loop iteration. It reads fresh raw data from the MPU6050 sensor over I2C and recalculates the current angle values using gyroscope integration and accelerometer fusion.
- mpu.getAngleX() → Returns the current pitch angle in degrees. Tilting the glove forward gives a positive pitch value; tilting backward gives a negative value. This controls forward and backward robot movement.
- mpu.getAngleY() → Returns the current roll angle in degrees. Tilting the glove to the right gives a positive roll; tilting left gives a negative value. This controls the turning direction.
- map(pitch, -45, 45, -100, 100) → Converts the raw pitch angle (in degrees) into a throttle integer value between -100 and +100. A 45° forward tilt maps to +100 (full speed forward). A 45° backward tilt maps to -100 (full speed reverse). The 45° range was chosen as the comfortable maximum tilt angle for controlling the robot.
- map(roll, -45, 45, -100, 100) → Same conversion for roll angle into a steering value. Tilting right maps to a positive steering value; tilting left maps to a negative value.
- constrain(..., -100, 100) → Clamps both values to the ±100 range. This is a safety measure to prevent out-of-range values if the hand tilts beyond 45°.
-
String(throttle) + "," + String(steering) → Packs the two integer values into a simple ASCII string, for example
"75,-30". Using a comma separator makes it easy to split and parse on the receiver side without any binary encoding. - setValue(data.c_str()) → Updates the BLE characteristic's stored value with the latest data string.
- notify() → Pushes the updated value to all connected BLE clients immediately without waiting for a read request. This is what makes control feel real-time — the robot receives new data every 30 ms.
- delay(30) → Sets the update rate to approximately 33 times per second (33 Hz). This gives smooth and responsive control while keeping BLE traffic at a manageable level.
Receiver Code Explanation (Robot ESP32)
Libraries Used — Receiver
- BLEDevice.h → Core BLE library that initializes the BLE hardware on the robot ESP32 and provides the client connection functions.
- BLEUtils.h → Internal BLE utility functions used by the scan and client classes.
- BLEScan.h → Enables the ESP32 to actively scan for nearby BLE advertising devices so it can find and connect to the glove transmitter.
- BLEAdvertisedDevice.h → Provides the class used inside the scan callback to inspect properties of discovered BLE devices, such as checking which service UUIDs they advertise.
Pin Definitions and Global State
- IN1, IN2 → GPIO pins connected to the L293d input pins that control the left motor. IN1 and IN2 together determine both the direction and speed of the left motor through PWM.
- IN3, IN4 → Same as above for the right motor.
- POWER_PIN (GPIO 4) → Connected to the L293d 5V enable pin. Setting this HIGH in software enables the motor driver. This gives software control over whether motors are powered, useful for safety shutoff.
- serverAddress → Stores the Bluetooth MAC address of the glove ESP32 once it is discovered during scanning, so the robot can connect directly to it.
- remoteCharacteristic → A pointer to the remote BLE characteristic on the glove server from which throttle and steering data is read.
-
doConnect → A boolean flag set to
trueinside the scan callback when the glove is found. The main loop watches this flag and triggers the connection sequence. -
connected → A boolean flag that becomes
trueafter a successful BLE connection is established. The main loop only reads motor data when this istrue.
BLE Scan Callback — MyAdvertisedDeviceCallbacks
-
MyAdvertisedDeviceCallbacks → This class extends
BLEAdvertisedDeviceCallbacksand overrides theonResult()method. Every time the BLE scanner finds a nearby advertising device,onResult()is called automatically with that device's details. - haveServiceUUID() && isAdvertisingService(serviceUUID) → Checks two conditions: first, that the found device is advertising at least one service UUID, and second, that the advertised service UUID matches the known SERVICE_UUID of the glove. This filters out all other BLE devices nearby and only responds to the correct glove transmitter.
- serverAddress = new BLEAddress(...) → Saves the MAC address of the matching device so the robot can connect to it directly by address in the next step.
- BLEDevice::getScan()->stop() → Stops the BLE scan immediately after the glove is found, freeing up BLE resources for the connection process.
- doConnect = true → Signals the main loop to begin the connection attempt on the next iteration.
connectToServer() Function
- BLEDevice::createClient() → Creates a BLE client object. In BLE terminology, the glove is the server (it owns data) and the robot is the client (it reads data).
-
pClient->connect(*serverAddress) → Attempts to establish a BLE connection to the glove using its saved MAC address. Returns
falseif the connection fails (for example, if the glove is out of range or powered off). - pClient->getService(serviceUUID) → After connecting, the client browses the server's GATT profile and retrieves the service matching the known UUID. This is the logical container holding the motion data characteristic.
- getCharacteristic(charUUID) → Retrieves the specific characteristic from the service. This is the actual data channel that holds the comma-separated throttle and steering string.
- connected = true → Sets the connection flag so the main loop starts reading and driving motors.
setup() — Receiver
- pinMode(..., OUTPUT) → Configures all four motor control pins and the power enable pin as digital outputs.
- digitalWrite(POWER_PIN, HIGH) → Powers on the L29rd motor driver immediately at startup by asserting the enable line HIGH through GPIO 4.
-
ledcAttach(pin, 1000, 8) → This is the Arduino 3.x ESP32 API for PWM. It attaches the specified GPIO pin to a PWM channel running at 1000 Hz frequency with 8-bit resolution (0–255). All four motor pins are attached this way so their speed can be controlled with
ledcWrite().
- BLEDevice::init("") → Initializes the BLE hardware on the robot ESP32. An empty string is passed because the robot does not need to advertise its own name — it only scans and connects.
-
setAdvertisedDeviceCallbacks(...) → Registers the custom callback class so that
onResult()fires each time a nearby BLE device is found during scanning. - setActiveScan(true) → Enables active scanning mode, where the ESP32 sends scan request packets to discovered devices to retrieve additional advertisement data. This improves the reliability of UUID detection.
- pBLEScan->start(0, nullptr) → Starts continuous BLE scanning with no timeout (the 0 means scan forever). Scanning stops automatically inside the callback once the glove is found.
loop() — Receiver
When the scan callback sets doConnect = true, the main loop catches it on the next iteration and calls connectToServer(). After the connection attempt (whether successful or not), doConnect is reset to false to prevent repeated connection attempts.
-
remoteCharacteristic->readValue() → Reads the latest value stored in the remote BLE characteristic. This returns the string that the glove transmitter last wrote, such as
"75,-30". - data.indexOf(',') → Locates the comma separator in the received string. This is used to split the string into its two parts. If no comma is found (indexOf returns -1), the data is malformed and the block is skipped safely.
- data.substring(0, commaIndex).toInt() → Extracts the throttle value from the beginning of the string up to (but not including) the comma, then converts it to an integer.
- data.substring(commaIndex + 1).toInt() → Extracts the steering value from after the comma to the end of the string, then converts it to an integer.
- throttle + steering → leftMotor → Differential drive mixing. Adding steering to throttle increases the left wheel speed when turning right and decreases it when turning left.
- throttle - steering → rightMotor → Subtracting steering from throttle produces the opposite effect on the right wheel, completing the differential drive behavior.
- constrain(..., -100, 100) → After mixing, the combined values could exceed ±100. Constrain clamps them back to the valid range before passing to the motor functions.
- delay(20) → Limits the motor update rate to 50 Hz, which is slightly faster than the transmitter's 33 Hz send rate. This ensures the robot acts on every fresh BLE packet without unnecessary waiting.
motorLeft() and motorRight() Functions
-
map(abs(speedValue), 0, 100, 0, 255) → Converts the ±100 speed value into an 8-bit PWM duty cycle (0–255).
abs()is used first because the L29rd direction is controlled by which of IN1/IN2 is driven high, not by the sign of the PWM value itself. - speedValue > 0 (forward) → Drives IN1 with the PWM value and holds IN2 at 0. This makes the H-Bridge drive current through the motor in the forward direction at the proportional speed.
- speedValue < 0 (reverse) → Drives IN2 with the PWM value and holds IN1 at 0. This reverses the current direction through the motor, spinning it in reverse.
- speedValue == 0 (stop) → Both IN1 and IN2 are set to 0, cutting power to the motor and letting it coast to a stop.
motorRight() works identically using IN3 and IN4 to control the right motor through the second H-Bridge channel of the L293d.
Gesture Mapping
- Tilt Forward → Robot moves forward
- Tilt Backward → Robot moves backward
- Tilt Left → Robot turns left
- Tilt Right → Robot turns right
Motor Mixing Logic
This formula allows smooth differential steering by independently controlling left and right motor speed. For example, if throttle is 60 and steering is 30, the left motor runs at 90 and the right motor runs at 30 — producing a right curve while still moving forward.
Working Principle
- The MPU6050 continuously measures hand orientation.
- The glove ESP32 converts motion into throttle and steering values.
- BLE wirelessly transmits movement data to the robot.
- The robot ESP32 calculates left and right motor speed.
- The L293d motor driver powers the motors using PWM control.
Why BLE is Used
Bluetooth Low Energy provides reliable wireless communication with low power consumption and minimal latency. Unlike Wi-Fi-based communication, BLE allows direct ESP32-to-ESP32 control suitable for real-time robotics applications.
Applications
- Gesture Controlled Robots
- Industrial Robot Navigation
- Wireless Wheelchair Control
- Smart RC Vehicles
- Hand Motion Controlled Machines
- STEM Robotics Education
Result
The robot successfully responds to real-time hand gestures using MPU6050 tilt sensing and BLE communication. Forward, backward, left, and right movement work smoothly with differential steering control. The wireless control system operates with low latency and stable motor response, demonstrating an efficient ESP32-based gesture-controlled robotic platform.
Checkout the full tutorial :